Want an easy (and stylish!) way to add a Pinterest “Pin It” hover button to your WordPress images? A “hover button” is a button that appears when you put your mouse over an image. Go ahead and test it out on this image below. Clicking on the pink Pinterest button that appears in the middle of the image will let you pin this image to your Pinterest boards. Cool, right? Well keep on reading to find out how to get this snazzy Pinterest Hover Button on your WordPress images too!
Note #1: These instructions are for Wordpress self-hosted (wordpress.org) websites and blogs — not for WordPress.com blogs. For Blogger blogs, see this post: How to Add a Pinterest Hover Button to your Blogger Images.
Note #2: in 2013 I wrote another blog post on this topic and recommended a different WordPress plugin; however the developer of that plugin has stopped updating the plugin and stopped responding to support requests. So I switched to this plugin for my website – and for my clients’ websites – and I have been very happy with it ever since.
How to Add a Pinterest Hover Button to WordPress
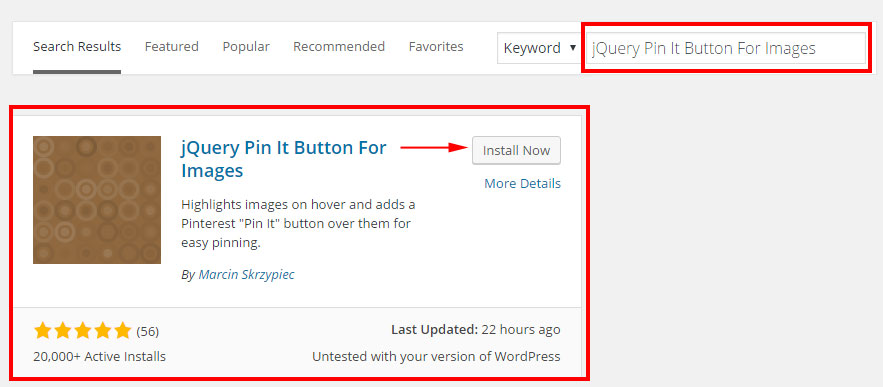
- Install and activate the “jQuery Pin It Button For Images” WordPress plugin. (In your WordPress dashboard, go to Plugins > Add New. Search for “jQuery Pin It Button For Images.” Click the “Install Now” button to install the plugin. Then click the link to Activate it.)
- To change any of the plugin’s default settings: select Settings > jQuery Pin It Button For Images in your WordPress Dashboard. I leave most of the settings at their default values. However there are a few things that I do change – and I have mentioned them below.
Now view one of your blog posts and you should see a gray rectangle-shaped Pin It button appear on top of your images when you put your mouse over an image. You can call it quits now — or we can customize things a bit…
Disable the Pinterest Hover Button on Small Images
Disable the Pinterest button from appearing on small images such as thumbnails, social media icons, and small images in your sidebar. The easiest way to do this is to set the minimum resolution (size) in the plugin settings: select Settings > jQuery Pin It Button For Images in your WordPress Dashboard. Images that are smaller than that size won’t have the Pin it hover button appear. What size should you use for your minimum resolution setting? I use 300 x 300. You can choose a size that work for your website; but I would not recommend going smaller than 200 x 200.

Set the Default Pinterest Pin Description
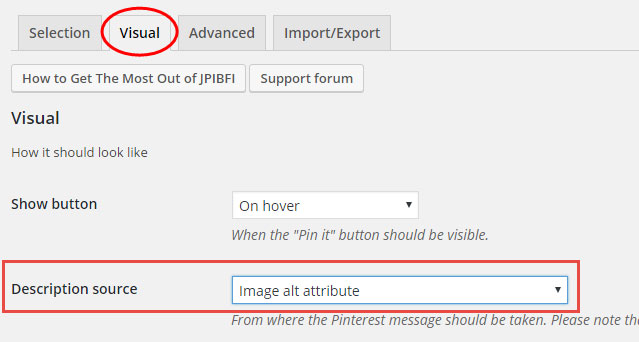
You can choose what the default description will be when someone pins one of your images. In your WordPress Dashboard, select Settings > jQuery Pin It Button For Images and then click on the Visual tab. The default Description source is the Page Title (or Post title for blogs). However I find that redundant, especially if you have Pinterest Rich Pins setup (since the page title and description will automatically appear on your pin anyway). If you’re good about entering in Alt text and/or Descriptions for your images when you upload them to WordPress (which is so good for SEO – so do that!), choose one of those options for your Description source. Otherwise if you don’t enter in image alt text or descriptions (naughty naughty!) — choose the Page Title.
Always Link to the Individual Page or Blog Post
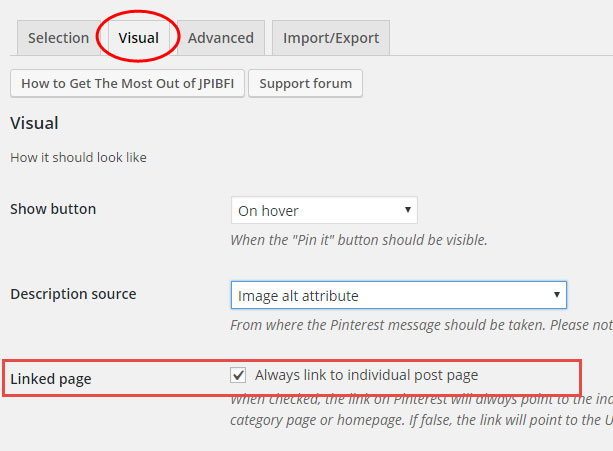
Have you ever clicked on a pin in Pinterest and have it go to the website’s home page or to another main page of the blog, instead of directly to the article that the pin was about? Annoying, right? Well you don’t want your website visitors to go through that – so make sure your pins are always linking to the specific article (blog post or web page) – even if your visitors are pinning the article from your main blog page, blog category page, or blog archive page. To do this, select Settings > jQuery Pin It Button For Images in your WordPress Dashboard. Then click on the Visual tab. Check the option to “Always link to individual post page”.
Customize Your Pin It Hover Button:
In your WordPress Dashboard, select Settings > jQuery Pin It Button For Images and then click on the Visual tab. Choose your desired settings for the following:
Transparency Value: When someone puts their mouse over your image to pin it, the image can fade a bit, making your Pin It button stand out more. Play around with different values for this setting to see what you like. Or you can choose 0.00 to have no fading effect added to your image.
Custom “Pin It” Button: Add some style to your Pin It hover button! Create your own custom button — or you can download my Free Pinterest Buttons for your Blog. Check the box to “Use custom image” and then click the button to upload your custom image. You also should enter in the height and width of your custom button.
“Pin It” Button Position: Choose where you want your Pin It hover button to appear on your image. You can choose the middle of the image (like I do) – or you can choose any of the 4 corners. If you choose one of the corners, you can also add some extra spacing between the edge of your button and the edge of your image by entering in values in the “Pin It” button Images boxes.
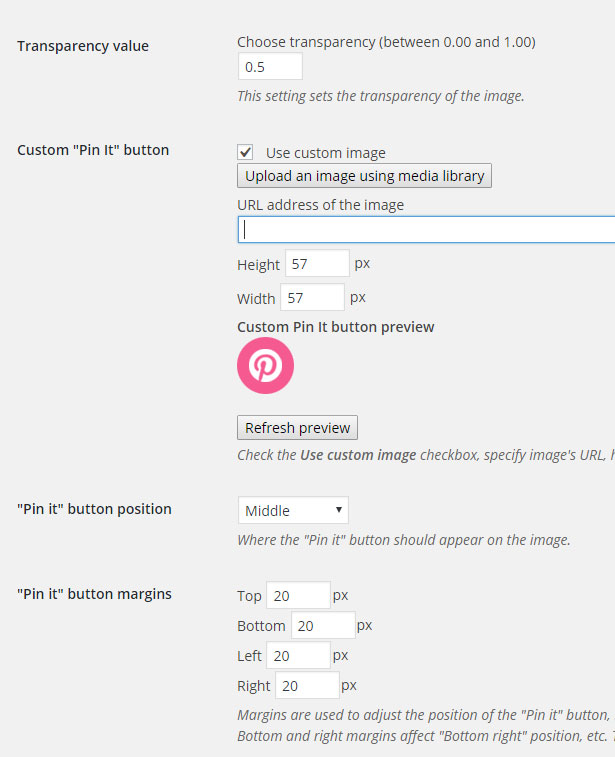
To find out more info about how to use this plugin, you can read the plugin developer’s documentation.
Now get going and add a Pinterest hover button to your WordPress images! Then leave a comment below with a link to your blog so we can check out how much you rock!
Don’t forget it… Pin it! 

Thank you for sharing this! I was searching and searching how to add a Pin it button. I found your article and it was super easy to understand. Thanks again!
You’re welcome, Kelly! Thanks for letting me know that it was easy to understand. That’s my goal! 🙂
Thanks so much! Just used this for my new site and LOVE the option to have my own custom Pinterest button!
You’re very welcome!
This post is a Godsend for me. Sadly, I’m late to the Pinterest party and just now learning how to effective use it, so this is a huge help!
You’re not too late!
This was of huge help to me too
This is an awesome tutorial! Thank you so much!
Thank you for this tutorial!! Just installed it and love love love the plugin. 🙂
You’re very welcome, Rebecca! I’m so glad it worked out for you!
I just checked out your blog and love all the pink! 😉
OMG this article helped me so much! Thank you!
Hi Kelly, great article. Do you know if this plugin allows you to select from multiple images? I have it installed and I only get the one image. I see other blogs where multiple images are displayed. Thanks so much!
Hi Neena. This plugin allows you to pin any images from your website. You just put your mouse over the image you want to pin and a button appears on top of the image. You can then easily save that image on Pinterest.
Thanks so much this was exactly what I needed!
Thank you for sharing, I’ve been into 5 sites just searching, but only here, that I can easily follow.
Hi Kelly,
Thanks for the step by step for us non-technical people! How do I get rid of the one that showed up with the website. I have the old one showing up in corner and the new one in the middle!
Hi Fran,
The Pin It button that shows up in the corner is just your browser’s Pinterest button. (You must have installed that on your browser.)
See: https://help.pinterest.com/en/articles/all-about-pinterest-browser-button#Web
Anyone that has that installed on their browser will see that. Anyone that doesn’t have it installed in their browser won’t see it. 🙂
Hi Kelly, thanks so much for this info. I found you after I added this plugin and you helped me configure it faster. I have a quick question. The plugin is not working right on my ipad mini AND my cell phone when I go to my website. It will work correctly on the first image and then the second image the button will show at the bottom middle and then after that my images do not show a pin it button at all. Is anyone else having a problem with this? I have a lot of images in my post and I would like anyone to be able to pin anyone of them. Thoughts?
Hi Anamari,
The developer of this plugin has a Pro version that’s supposed to work better with mobile devices: https://highfiveplugins.com/downloads/jquery-pin-it-button-for-images-pro/
Thank you! I like this plugin in a lot better than the other one I was using!
I was looking like crazy for a plug-in that was pretty and would show up on mobile. Thank you!!!
Kate
Thank you, thank you! I have been trying to find a Pinterest Hover plugin for weeks – most don’t even work properly, let alone look good. This one is perfect! <3
Awesome post. I am searching for this from a long time.
Also I loved your blog design. This is amazing.
Pinterest is one of the best way to spread the images and get traffic.
Thanks for sharing this post. I am also going to share this post for others.
~Swapnil Kharche
Thanks for the tutorial! I went with the “old school” Pin It button as you can see on the post I’ve linked. Just one thing – I didn’t see the Linked Page option in my settings. Hopefully that means they’ve now set it as a default. Thanks again!
You’re right! They did remove that setting now. And yes — hopefully this is just done by default now.
Thanks so much for the tutorial!! Perfect for non-techy people like me. My old pin-it button was not so cute. I also downloaded your summer pin button collection and the peach colour matched my blog perfectly. Thank you!!!
Michaela
So awesome to hear, Michaela! Thanks for letting me know! 🙂
Thank you so much for sharing this! It helped me so much!!
Thanks Kelly. Very helpful! I was having a hard time finding a good plugin before I found your article. You can check out one of my posts (with the new Pinterest hover button)… http://putthekettleon.ca/2017/05/25/top-inspiring-step-parenting-quotes/
You site is beautiful by the way.
Cheers!
Yolanda
Thank you so much, Yolanda! 🙂
None of the Pinterest plugins I’ve tried, including this one, seem to be working! It’s so strange! Do you have any idea why? Also the plugin you recommend in this post looks a little different – there isn’t an option in the settings to link to original post rather than just the blog home page. Any help would be amazing! X
http://www.fashionetmoi.com
Without knowing more details about how your website is setup, it’s hard for me to say why it’s not working for you. Also, this plugin has been updated since I wrote the blog post, so some of the options and screenshots may look different.
This is super helpful! Thank you so much! 😀 Just added this to my site, http://www.dwellboxes.com! SUPER happy with it 🙂
Hi Kelly,
thank you for sharing this! I like this plugin, but when I installed it, the settings page is empty also if I turn off every other plugins. Have you got any idea, why?
Hmmmm. That’s odd! I would recommend deleting the plugin — and then try reinstalling it again. If that doesn’t work, it could be a conflict with your theme.
Thank you so much for this post! It was so helpful and easy to follow! 🙂
This was so helpful! Thank you.
Thanks for this post. I’ve been making each button by hand for every post but this is much easier. I only wished it would display the pin on mobile devices by default. You have to click the pic first but who would know that? The always on option is only available if you pay for the pro version. I may have to spring for it.
Thank you, thank you! I have been trying to find a Pinterest Hover plugin for weeks – most don’t even work properly, let alone look good. This one is perfect! <3
The plugin is excellent. I have installed it on our website and it works very well. The very complete and simple configuration. We have used other plugins but they work poorly or lack custom configuration.
It would be great if I could show text
Grateful for recommendation.
Thank you so much for sharing this! It helped me so much!!