![]()
One of the essential elements of a website is the favicon (aka “website icon” or “site icon”). Your favicon plays a big role in your branding. And it also allows website visitors to quickly recognize your website. So I highly encourage you to add one to your website or blog.
Don’t know what a favicon is? It’s the tiny graphic associated with your website that appears:
- On browser tabs:

Favicon in Browser Tab - In the website address bar on many browsers
- In browser bookmarks and favorites
- In search engine results
- As the application icon on mobile devices (for example, when someone adds your website to their phone’s home screen)
Tips for Creating an Awesome Favicon
- Try to use a variation of your logo, if possible. At the very least, use a favicon that matches your brand’s colors.
- Keep it simple! It is going to be teeny tiny – so it can’t have a lot of detail in it.
- If you want your image to have a transparent background, you will need to first create your image as a PNG or GIF file format with transparency enabled.
For example, my favicon uses the “K” from my logo – with a transparent background:

Below are instructions that will walk you through how to setup a favicon for your website. Just click on these links to jump to the section that applies to your type of website:
Adding a favicon to a WordPress website or blog
WordPress has a feature that makes adding a favicon to your website SUPER easy:
- Create an image that’s 512 pixels wide by 512 pixels high. Save it as a PNG, JPG, or GIF image.
- In your WordPress admin area, click on Appearance > Customize
- Click on General Settings > Site Identity
- In the Site Icon section, click on the “Select Image” button. Then upload your image (or select it from your Media library if you previously uploaded it). Click the “Select” button to use that image.
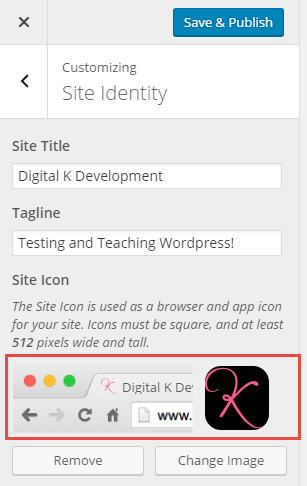
- You will now see a preview of your favicon as it will look on a browser tab – and how it will look as a mobile application icon. Click the “Publish” button at the top to save your new favicon!

Adding your favicon to your WordPress “Site Identity”
*Note: To see your new favicon, you may need to clear your browser’s cache or restart your browser.
Adding a favicon to a non-WordPress website
- Create a square image for your favicon and save it as a PNG, JPG or GIF image.
- Use an online favicon generator to convert your image into your favicon icon (in the ICO file format). I have used both http://tools.dynamicdrive.com/favicon/ and http://www.favicon-generator.org/. They are free and work great. After uploading your image, it will create a favicon.ico file for you. Download your favicon.ico file to your computer.
- Blogger users can follow the instructions here. If you’re not using Blogger, keep following the steps below.
- Use an FTP client to connect to your website. Upload your favicon.ico file to your website’s main (root) directory.
- If your website has its header code saved in a separate file, add the following 2 lines of code to that file. If your website does not have a separate header file, you will need to add the following 2 lines of code to every web page in your website (or every web page that you want to use your favicon). Add this code below the <head> HTML tag (making sure to use your own website address instead of “yourwebsite”):
<link rel="icon" href="http://www.yourwebsite.com/favicon.png" type="image/x-icon" /><link rel="shortcut icon" href="http://www.yourwebsite.com/favicon.png" type="image/x-icon" />
*Note: To see your new favicon, you may need to clear your browser’s cache or restart your browser.
Don’t forget it… Pin it! 
![]()


When creating a favicon, could I use a program like PIC MONKEY? Also, how do I find out the color of the text on my blog? I didn’t create it so I have no idea the color used. I am trying to create a simple favicon that says LLC with teal font on my blog and a similar cursive font or block text..whatever looks more easy to read and possible watermark leopard print in the background if its not too busy.
There are some browser add-ons you can install that will tell you the colors in a website. Or you can take a screenshot of your website and then open it in a graphic program that has a color picker that tells you the color codes. To save you some time, I checked your website and these are the 2 main colors on your website:
The brown color is #cba773 (which is also the RGB color: 203-167-115).
The teal color is #16b2b4 (which is also the RGB color: 22-178-180).
I hope this helps!
Yes, thank you!
Actually not super easy. Have been trying for the past 6 months. Nothing works. Some site say “With an FTP Client, upload the new favicon.ico file into your current theme’s main folder” some site say use WordPress to upload an image via WordPress Cusomtization screen. Whatever method tried doesn’t work.
New Header file? What is the file name & location?
Hi Julius,
I have included instructions in this blog post for how to add a favicon to your website. The directions are different depending on what type of website you have.
What method are you using from my instructions above? And what problems are you running into?
Kelly:
I have included my favicon in the Site Identity and it still shows that I have the icky Hostgator gator! I am running WordPress with Genesis and Kelly theme. What am I missing? It’s being completely ignored. Do I need to save it to my CP backend FTP?
Hi Tammy. I just visited your website and I am seeing your new favicon (not Hostgator’s). You might just need to clear your browser’s cache in order to see the updated favicon.
Thank you! I’ll do that again, I had made some changes after I did it before.
I love your tutorials very easy to follow. I successfully completed adding the Rich Pen to Pinterest and creating my Favicon. For some reason it’s not showing up above the title on my Pinterest Posts, any ideas?
Pinterest changed their rich pins. They now show your Pinterest profile picture, instead of the website’s favicon.
Great post! Thank you for the walk through. Very helpful
Kelly. Thank you, a million thank yous for ALL of your help & for making it EASY to follow.
So glad you found this helpful!!