Pinterest Rich pins display additional information that Pinterest gets from your website. Rich pins give you (and your website!) credibility. Rich pins also help your pins stand out in the Pinterest newsfeed. To show you the difference between a rich pin versus a pin from a website that does not have rich pins enabled, take a look at the pins below.
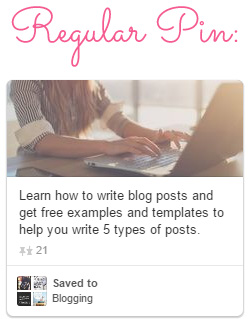
Here’s an example of a “regular” (non-rich) pin:
And here’s an example of a rich pin:
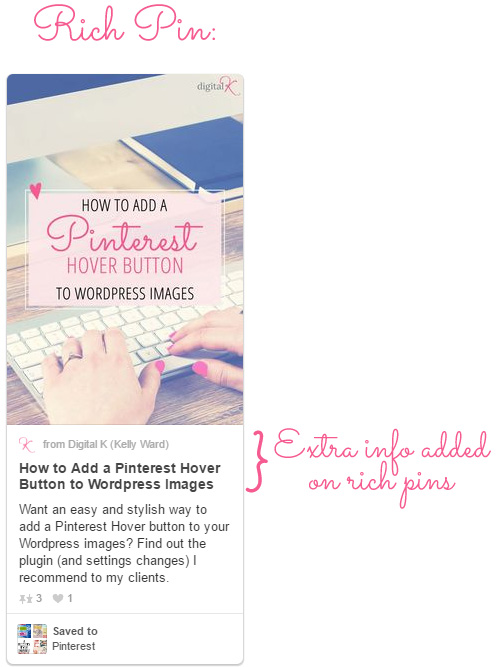
Notice how it displays extra information from my website, including my favicon (very helpful for branding!), my website title and the blog post title.
OK. So I bet you want in on the rich pin fun now, right? If you go to Pinterest’s website to get instructions for how to enable rich pins on your blog posts, you will find a bunch of techy instructions and code. But don’t freak out just yet! I got you, boo! There’s a quick and easy way to do this without dealing with all the code! It’s seriously easy as pie. Well actually, it’s easy as cupcakes. (Cupcakes are way easier to make than pie!) Read on, my friend…
Step 1: Get Your Website Ready
- If you don’t already have the Yoast SEO plugin installed on your WordPress blog, install and activate it! (Go here for more information on the free version of the plugin, which is what most of my clients use – or go here for the premium version of the plugin.)
- Now go to SEO > Social in your WordPress admin area.
- Click on the “Facebook” tab at the top. (Yes, Facebook! Trust me on this one.)
- Make sure that “Open graph meta data” is enabled. (If it’s not, go ahead and enable it and then click the “Save Changes” button.)
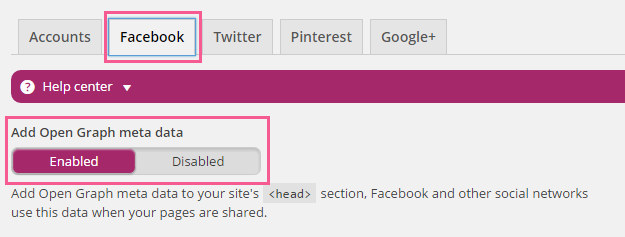
The Yoast SEO plugin will take care of all that techy code that Pinterest wants to see on your website. Woohoo!
Step 2: Let Pinterest Test it Out
Now go to Pinterest’s Rich Pins Validator. Enter the URL (aka “website address”) of a blog post from your website. (It doesn’t matter which one you choose. And you only need to validate this one blog post to enable Rich Pins across your entire website.) Then click the “Validate” button.
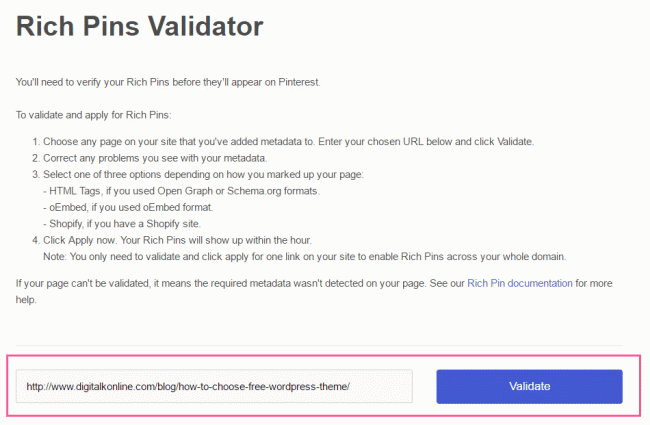
You should now see a confirmation message saying that your pins have been validated by Pinterest. It should also show your website name and favicon. (If it doesn’t show a favicon, you can set that up on your website by following the instructions in this blog post.)
Step 3: Apply
Make sure “HTML tags” is selected and then click the “Apply now” button.
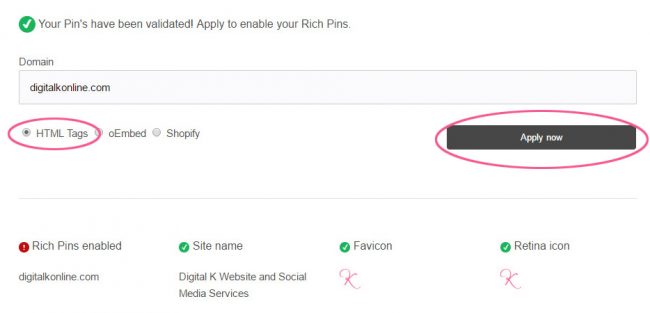
And…. You’re done!
Now you just need to wait for Pinterest to approve the rich pins for your website. This used to take a week or longer; but lately it’s only been taking a few minutes when I set this up for my clients. You’ll get an email from Pinterest confirming that you’re approved.
After you’re approved, your pins from your blog will start appearing as Rich Pins when added to Pinterest. Existing pins that link back to your blog posts will also start appearing as Rich Pins (no need to repin them). But note: it might take up to 2 weeks for all of your Pins to appear as rich pins.
And that’s it! Super easy, right? Let me know how it goes for you in the comments below.
Don’t forget it… Pin it! 

I am looking at my pinterest pins and I don’t think they are rich pins. I also don’t have a favicon for my blog. Do you have steps on how to do this on blogger or I will have to do it the long techy way?
Below is a link to my Leopard Lace and Cheesecake board. I hate that thumbnail but I don’t have anything else to use. That is very old.
https://www.pinterest.com/tanya527/leopard-lace-and-cheesecake/
Tanya, I just checked your pins and you’re right — they’re not rich pins. Unfortunately on Blogger, you’ll need to insert Pinterest’s code into your Blogger template.
To setup your favicon, just follow my instructions here: http://www.digitalkonline.com/blog/add-favicon-to-website/#nonwordpress
OMG you are my saviour!!!!! I have been trying to figure this out for, I kid you not, 5 MONTHS!!!! It never used to work for me and I could not figure it out for the life of me!!! So excited!! Now I need to check out your favicon post!!!
xx Victoria
Hi, Kelly! Thank you for such a great article. I just installed the free version of Yoast SEO and didn’t get the SEO>Social option you were referring to. Thinking that perhaps it was now only in the Premium version of Yoast, I purchased that…but still no Social option. This is what I see:
SEO > Dashboard (includes tabs for General, Features, Company Info, Webmaster Tools, Security, Site Wide Analysis)
SEO > Search Console (includes tabs for Smart Phone, Feature Phone, Settings)
SEO > Go Premium (which I already did)
SEO > Redirects (includes tabs for Regex Redirects, Settings)
Any advice?
That’s really odd! I have the latest version installed (not Premium) and I’m still seeing the SEO > Social option in my WordPress menu. I would suggest contacting their support and asking them about this.
Hi Nikki, I had the same problem as you (the Social section was missing). It turns out you need to enable the advanced settings (I initially thought this was a premium feature but it is available on the free version too). Go to your Yoast SEO dashboard and select the ‘features’ tab, enable the Advanced Settings Tab and save changes (there’s a save button at the bottom of that tab). A whole load of new options will appear in the list on the left-hand side. Hope this works for you
Thanks for the tip, Heidi!!
I had the same issue with it. I could not find the Social tab! Glad I found this post and read your helpful comments! Thank you!
Thank you for this! I was having issues where all of the sudden pinterest was taking the metadata from the wrong blog post each time I pinned something. By adding in the social section to Yoast it fixed the problem!
You’re welcome! I’m glad using Yoast helped you out. It certainly makes things easier.
Kelly that is incredibly easy, thank you. Question for you though, I have 3 websites that I write on regularly. Should I have a Pinterest Account for each of those websites? Right now they are all on one account. I notice that Tailwind doesn’t seem to like that. Any insights would be appreciated.
That really depends on the goals you have for each website. Some things to think about: Are the websites related in topics? What’s the difference between them? Does each website have a different target audience? If the topics or the audience are different, I would recommend setting up different Pinterest accounts.
What is the little red (!) next to “Rich Pins enabled”? Is that okay, because mine looks like that.. However my pins aren’t appearing as RECIPE Rich pins on Pinterest, but rather as articles. Do you know why that may be?.
Does yours look like the screenshot I posted in this blog post (with the red “!”)? If so you should be OK.
Regarding Recipe pins — this blog post is for setting up Article Rich Pins. Pinterest has different types of rich pins. If you want to use Recipe rich pins, see:
https://developers.pinterest.com/docs/rich-pins/articles/
Thank you for your help, i was always wondering how to create rich pins. You simplified everything very clearly through you post.
Thank you so much for the tutorial, I have been wanting to get rich pins for my site and this helped a lot.
Can’t thank you enough for this!!! I’ve put it off for so long because any article I’ve read on this never made sense. You are bomb!!!!
Awwww! Thank you! 🙂
Hello, I have rich pins enabled and have validated several posts on my page, They all come back as validated. However, none of the pins I put on Pinterest are showing as rich pins. I am missing the bold title and I feel there is something I must be missing but have googled this with no real answer. Thank you.
Hi Mary. I just checked your pins on your Pinterest account and they are showing a bold title above your description.