A couple weeks ago, I wrote a blog article about How to Add Rich Pins to your WordPress Blog. But I neglected to help out my readers who are on Blogger! (So sorry for that!) This blog article will walk you through step-by-step how to add rich pins to your Blogger blog. (You can thank my blog readers and newsletter subscribers for calling me out on that!)
But first – what are rich pins and why do you want them? Pinterest Rich pins display additional information that Pinterest gets from your website. Rich pins give you (and your website!) credibility. Rich pins also help your pins stand out in the Pinterest newsfeed. To show you the difference between a rich pin versus a pin from a website that does not have rich pins enabled, take a look at the pins below.
Here’s an example of a “regular” (non-rich) pin:
And here’s an example of a rich pin:
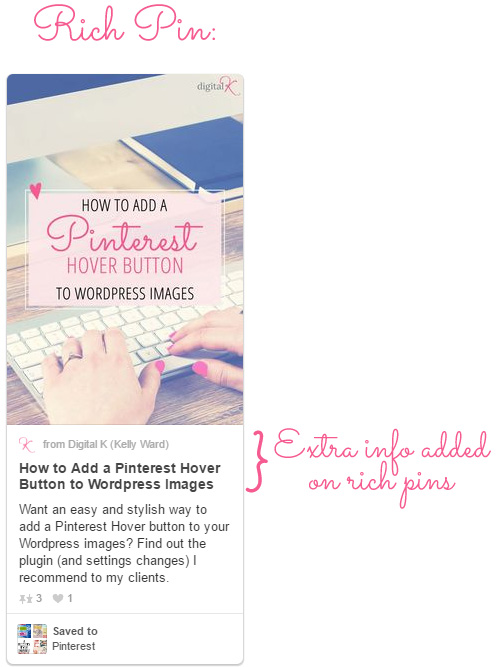
Notice how it displays extra information from my website: my website’s favicon (very helpful for branding!), my website title and the blog post title.
Note: Since publishing this blog post, Pinterest has stopped displaying the favicon underneath the pin image.
So I bet you want in on the rich pin fun now, right? If you go to Pinterest’s website to get instructions for how to enable rich pins on your blog posts, you will find a bunch of techy instructions and code. Unfortunately they don’t give you the exact code to use for your Blogger template. But don’t freak out! I have simplified the instructions for you, including the exact code you need to cut-and-paste into your blog’s template. It’s easy as pie cupcakes. (Cupcakes are way easier to make than pie!) Read on, my friend…
Step 1: Get Your Blogger Blog Ready
1. Setup your Blog’s Meta Description:
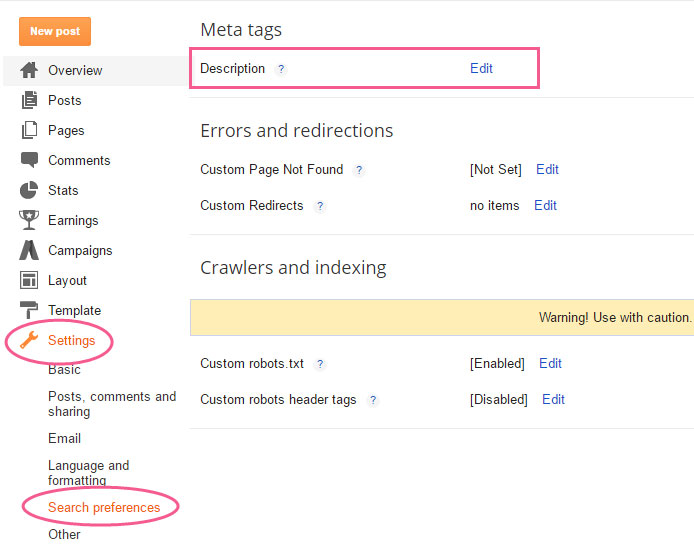
- Login to your Blogger account and go to Settings > Search Preferences in your admin menu.
- Make sure you have a description entered in the Meta Tags Description.
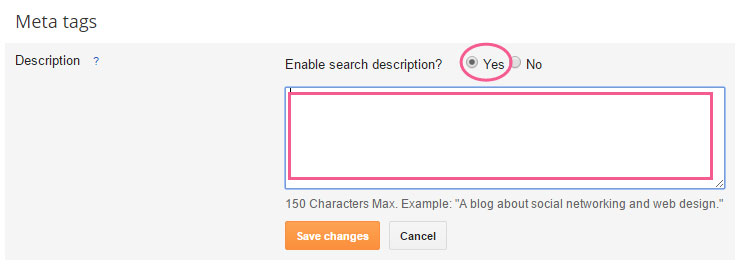
- If you don’t have this setup already, click on the “Edit” link. Select Yes to enable this and then enter in a short description for your blog (150 characters or less). Click the Save Changes button to save your description.
2. Add Descriptions to your Blog Posts:
NOTE: This is optional; but I do recommend it. Also – you don’t have to do this step before you get rich pins setup. It can be done now – or in the future.
When you add a new post (or edit an older post), you will see a box in the Post Settings sidebar that allows you to enter a Search Description for the post.
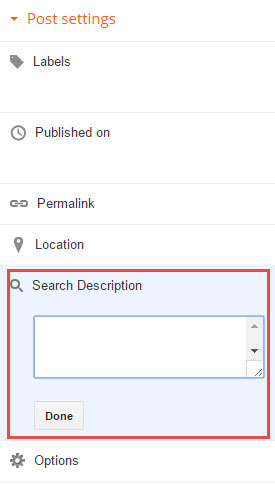
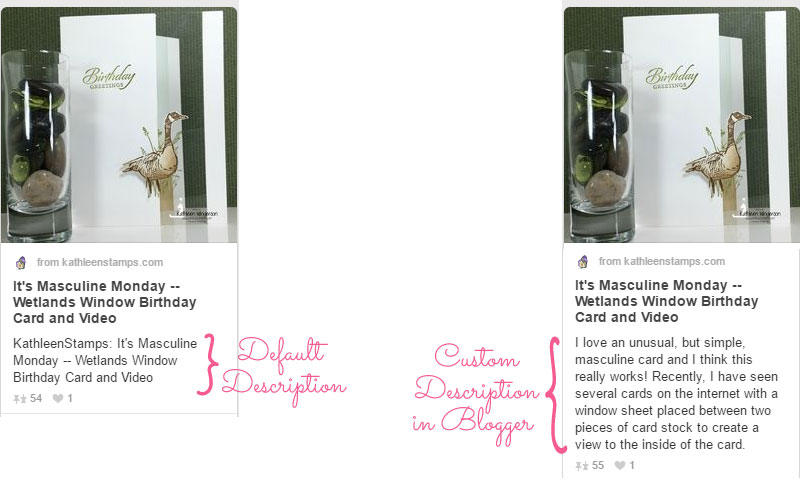
This is a great place to write a brief description of your post – and it will show up on your rich pins in Pinterest. However you can leave it blank – and Pinterest will just show your post title instead. (But I find this redundant and recommend that you enter in a description that will make people interested in reading your post. Also include relevant keywords that you want to be found by in searches.)
3. Edit Your Blog’s Template:
NOTE #1: This requires editing your Blogger template. Before proceeding with the instructions below, I recommend that you backup your Blogger template first!
NOTE #2: When you’re editing your template, if you see black triangles on the left side of the code – that means that there are section(s) of code collapsed/hidden in those sections of your template. Make sure you click on ALL those triangles to expand (display) all the code. Do not paste the code into your template until you have clicked on ALL those black triangles around the line of code that you’re searching for in #2 below.
- In your Blogger Dashboard click on Template and then click the “Edit HTML” button.
- Put your mouse cursor in the template’s code box and search for this line of code:
<b:includable id='post' var='post'>
(To open the search box, press the Ctrl+F buttons on a PC or the Cmd+F buttons on a Mac.) - Underneath that line of code, paste this code into your template:
<meta property="og:type" content="article" />

 <meta property="og:title" expr:content='data:post.title' />

 <meta property="og:description" expr:content='data:blog.metaDescription' />

 <meta property="og:url" expr:content='data:blog.url' />

 <meta property="og:site_name" expr:content='data:blog.title' />

 <meta property="article:published_time" expr:content='data:post.timestampISO8601' />

 <meta property="article:author" content="YOUR NAME HERE" />
- In the last line of code, replace “YOUR NAME HERE” with your name. (Or if you don’t want to list your name, you can just delete that last line of code.)
- Click the “Save Template” button.
- Click the “Close” button.
Now you’re done with all the techy code that Pinterest wants to see on your website. Woohoo!
Step 2: Let Pinterest Test it Out
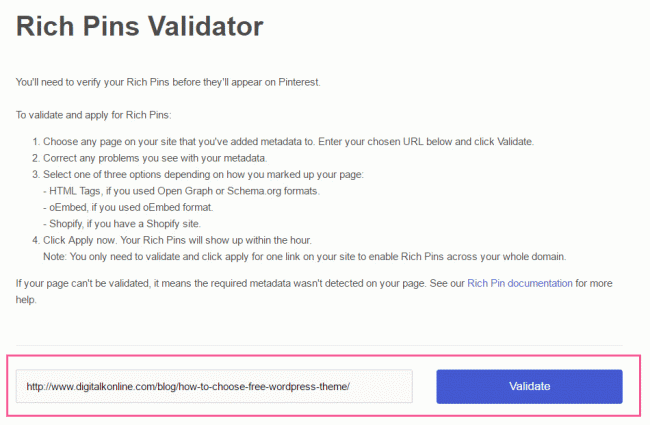
Now go to Pinterest’s Rich Pins Validator. Enter the URL (aka “website address”) of a blog post from your website. (It doesn’t matter which one you choose. And you only need to validate this one blog post to enable Rich Pins across your entire website.) Then click the “Validate” button.
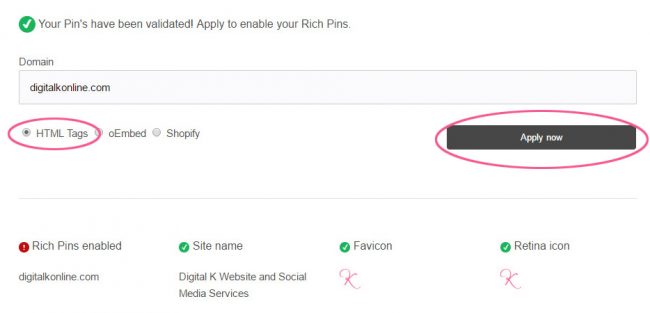
You should now see a confirmation message saying that your pins have been validated by Pinterest. It should also show your website name and favicon. (If it doesn’t show a favicon, you can set that up on your website by following the instructions in this blog post.)
Step 3: Apply for Rich Pins
Make sure “HTML tags” is selected and then click the “Apply now” button.
And…. You’re done!
Now you just need to wait for Pinterest to approve the rich pins for your website. This used to take a week or longer; but lately it’s only been taking a few minutes when I set this up for my clients. You’ll get an email from Pinterest confirming that you’re approved.
After you’re approved, your pins from your blog will start appearing as Rich Pins when added to Pinterest. Existing pins that link back to your blog posts will also start appearing as Rich Pins (no need to repin them). But note: it might take up to 2 weeks for all of your Pins to appear as rich pins.
And that’s it! Super easy, right? Let me know how it goes for you in the comments below.
Don’t forget it… Pin it! 


Thank you so much! I find your posts SO helpful in improving my blog! Now I am going to check out how to create a favicon!
You’re very welcome, Tanya!
Thank you for your helpful article. Pinterest has validated my rich pins so I have set up everything in the HTML of my template correctly (yay!) I have also added a description to each of my posts (past and present.) Is there anythingI need to do to the HTML of each blog post?
Thanks again!
You should also make sure you’re adding a description to each of your images on your posts.
Thank you so much for this!
You’re welcome!
Thanks! waiting to be approved x
You’re welcome, Michelle!
This was so helpful, thank you!
Thank you! You were the first I found that was actually helpful! Sharing with my blogger friends 🙂
Thank you, Sarah! I really appreciate that!!
Question, I did exactly what you said, now at the beginning of every post right under the title it says meta property=”og:type” content=”article” /> ….any way to get rid of that? Thanks!
sorry Here is my Blog. Thank you for any help! http://www.foxysdomesticside.com/
Hi Sarah, You’re missing the “<" before your code. There should be a "<" before the "meta...."
haha, nevermind, I think i fixed it. Somehow after I saved, the code got messed up, when I put your code in again, it got rid of it…hopefully on Pinterest they still show up as Rich Pins. Sorry, so many comments 🙂
No problem! I’m glad you got it figured out.
Hi Kelly! This is a really easy tutorial to follow! Thank you! I am experiencing one problem, though. When I paste in the new HTML I’m getting this message: The widget with id “Blog1” cannot contain element: “meta”. A widget can only contain b:includable elements. I enabled the Meta Tags so I don’t know if I’m doing something else wrong?
It sounds like you’re trying to paste the HTML code into a widget. You need to paste that code into your template file instead.
Thank you for this post! I’m getting that same message that Whitney received, but I’m placing the code where you said to. Any suggestions what to do?
Thank you!
Rachael
Make sure you are searching for the correct line of code (as shown above).
And make sure you are and pasting the code into a new line AFTER that line of code.
Ugh so frustrated. I am doing it under that exact line and I still am getting that message. I have no idea what I’m doing wrong.
Hi Rachael. Feel free to contact me (through my Contact page) with access to your blog and I can take a look at it for you.
When you’re editing your template, if you see a black triangle on the left side of the line of code that you’re searching for — make sure you click on that triangle to expand (display) all the code in that section.
Hi, this doesn’t seem to be working for me for some reason. I had put this in my old template and it worked but now I put it in my new template and the pins aren’t showing the description I applied.
Hi Leslie, I just looked at your most recent blog post and you don’t have any descriptions setup for your images. You need to make sure you do that.
Kelly- This is a wonderfully clear tutorial. I have one problem and that is this line of code: does not exist in my blogger template. Any advice? TIA
Hi Rebecca,
If you aren’t finding that line of code, you might need to click on the little triangles that you see on the left side of your template. That will make ALL the code visible in those sections. (Blogger hides some sections of code.)
Thank you so much!! Super incredibly useful! x
Margaux
Thank you so much for this!
You’re very welcome, Nichole!
Thanks so much for this straightforward tutorial!
thank you so much! it worked well for me
Dear Kelly, thank you so much for your post. Finally I have understood the difference between normal pins and rich pins!
Oh thank you so much! All the other tutorials were so confusing!
Oh Thank you, thank you for this! I have been meaning to do this, but everyone’s how to pages were not concise enough for me… and this was so quick. Yay!
I tried to include the code at the place you said in two blogs, but Blogger refuses to save and says “The widget with id “BlogArchive1” cannot contain element: “meta”. A widget can only contain b:includable elements.” Any idea what I should do?
Are you sure you’re pasting the code in the correct location of your template?
Feel free to contact me (through my Contact page) with access to your blog and I can take a look at it for you.
Thanks for the info on Blogger – you have made my day! All I have seen is rich pins for Word Press, and the info on Pinterest was no help
very very help full article. thanks.
Kelly, I cannot thank you enough for this post! It seemed like such a daunting task configuring it all by myself, but your instructions helped me tremendously! Now I not only have rich pins figured out, I also have a favicon for my blog! LOL! You rock, thank you!!!
Awesome! Way to go, Raya!
I got this message when I tried adding the code: The widget with id “Blog1” cannot contain element: “meta”. A widget can only contain b:includable elements.
How can I fix it? Any help is greatly appreciated.
Are you sure you’re pasting the code in the correct location of your template?
Feel free to contact me (through my Contact page) with access to your blog and I can take a look at it for you.
Thank you Kelly, this post was so helpfull! I´ve just got my rich pins approved, so we will see, what will happen with my blog traffic!
Once again – thank you and greetings from Switzerland! xoxo
Thank you, Pinterest is one of my best traffic drivers so anything that improves my image on there is very welcome 🙂 xx
These steps were super easy and I did it! Now I am just waiting to hear back from Pinterest. Thank you!!!
Great! I’m glad this helped you!
Hi Kelly, thanks for the wonderful tutuorial. I did everything as you mentioned but after applying on pinterest developers it says “Something went wrong on our end” Do you know what is it ?
That usually means there’s an issue on Pinterest’s end. So I would recommend trying again in a few hours. And if you still get that message, contact their customer support.
I’m having the same issue! Getting so annoying D:
I just did a little bit of research on this and Pinterest has confirmed that this is a problem on their end and they are working on fixing it. So I would recommend trying again every few days to see if they have it fixed yet.
Wow that was so easy! Thank you so much for sharing this!
Thank you very much, but it did not work for me, they said Something went wrong on our end
That usually means there’s an issue on Pinterest’s end. So I would recommend trying again in a few hours. And if you still get that message, contact their customer support.
I just did a little bit of research on this and Pinterest has confirmed that this is a problem on their end and they are working on fixing it. So I would recommend trying again every few days to see if they have it fixed yet.
I read that too. But thank you anyway. I didint finish but it was a big help.
Girls, it is the end I guess, when you click on help, you will find this Note: As of January 2017, we are no longer supporting place and movie Rich Pin types. All existing place or movie Pins will continue to show as normal on Pinterest.
It’s just the Place and Movie rich pins that aren’t going to be supported any more. All the other types will still work. For example, I use Article rich pins on my website.
Thank you, thank you! I’ve been wanting to enable rich pins but it seemed like such a daunting task. Your tutorial was perfect and I was able to get everything set up in about 10 minutes.
Thank you for this post Kelly. I just added the code and waiting on their email now. Your instructions was clear and easy to follow. I heard about rich pins and had no idea what it was until I saw yesterday some blogger’s pins have bold titles and mine have none. lol Silly me for not looking further into rich pins when I started using Pinterest a few months ago. Luckily I’ve found your post to help me set it up. 🙂
Thank you! Such a well laid out and informative post, I appreciate you sharing this information.
Super helpful! Thanks so much!
🙁 So I’m getting a strange message when trying to validate.
The data we scraped from your site could not be validated. Please make sure all required tags are present and you aren’t serving different pages depending on different user agents.
Hmmm…. I’m not sure what’s going on without being able to see your code and settings. But it sounds like something is not setup correctly with the “meta” tags/code in your template. Have you tried going through all the steps a second time (including copying/pasting the code into your template) to make sure you have done every step?
Thanks a lot for the tutorial! I have just added it to my site, very easy with your explanation!
Thank you FIVE BILLION TIMES over!!! 🙂 I’m so glad I ran into your site before I tried doing this any other way.
Hello! I’ve been having a very hard time with getting rich pins on my blog… I was SO excited when I found this post! However, I’ve run into a problem. I tried searching for ““- but it’s NO WHERE in the html. (I used CTRL F). Is there a reason I don’t have it? Can I add it? Please advise! Thank you!
Sorry for the double post- I realized part of my comment isn’t coming through because of the html. The code that I cannot find is the “includable” one.
Hi Melissa,
Make sure you are clicking on the little triangles that you see on the left side of your template. That will make ALL the code visible in those sections. (Blogger hides some sections of code.)
Hi – thanks so much for this tutorial – it made it so easy for me! I’ve been wanting to enable rich pins for ages, but was daunted as to how to do it! Thanks for such a helpful and easy to follow tutorial!
I’ve installed it and it all seems to be working well – I’ve also tried to make sure I create better pinnable images!
One question I had, though, is with regards to the amount of text pulled through from my blog post, into the pin. For example, this one: https://uk.pinterest.com/pin/426153183476754212/ looks as I would expect it to, with the description I added to the image and the metadata of the blog post.
However, this one: https://uk.pinterest.com/pin/426153183476754242/ has the description I added, but it’s right at the bottom. Above it, all the text from the blog post has been pulled across! I’m not sure if this actually matters or not – it just seemed strange that it sometimes does that, and sometimes doesn’t, when I’m not doing anything different. I wondered if all that text might put people off. Before you click into the pin, when it’s just on the board, it shows the description I added to the image and metadata of the blog post, so that’s good. It’s only when clicking on the pin to open that pin, that it shows all that extra text from the blog post. Not sure if you have any thoughts on that?
Thanks again so much for helping me to finally enable rich pins!
Maria
Hi Maria,
In the “Step 1: Get Your Blogger Blog Ready” section of this blog post:
– Did you do items #1 and #2?
Hi Kelly, yes I did those steps, and I’ve just checked and there is definitely a description in the meta tags field now.
Thanks,
Maria
Glad to hear it’s working for you now. Maybe it was just a temporary glitch with Pinterest?
This is such an easy to follow tutorial!!!! I got to the rich pin validator step but once I entered my URL it told me meta data could not be found on my site. Any tips? http://www.maryellenscookingcreations.com is my blog – can you tell by looking at it? Thank you!!!!!
Hi Mary Ellen,
I just looked at your blog and everything looked fine to me. I also went to the Pinterest Rich Pins Validator and it validated. So I would suggest going back to the Validator and apply again.
Thank so much! Super helpful <3
– Marcy
This tutorial was great and super easy to follow but I am having one issue. For some reason the description Pinterest is pulling is the general one for my blog (set up through the ‘search preferences’ ‘meta tags’ and not the description for the specific post. Any suggestions?
Sarah, make sure you do Item #2 in Step 1 above: “Add Descriptions to your Blog Posts”
I’ve been looking for a longtime for guide installing Rich Pins on blogger.com. Now I found it. It was easy to follow your description. It´s done. Thanks!
I think I followed all the steps – but the last one, to apply for Rich Pins, wasn’t there, and when I look back at the pins from my site, they don’t look to have changed to Rich Pins? Any advice?
When you validate your website link, does it show you that your rich pins are already approved by Pinterest? If so — it won’t let you apply again (since it’s already approved.)
You’re my hero! Thank you for putting this together!
Awww! Thank you, Katie! 🙂
Hey, I did everything you had written down but I keep on seeing this message,
the widget with id “Blog1” cannot contain element: “meta”. A widget can only contain b:includable elements.
Make sure you are searching for the correct line of code (as shown above).
And make sure you are and pasting the code into a new line AFTER that line of code.
Also, when you’re editing your template, if you see a black triangle on the left side of the line of code that you’re searching for — make sure you click on that triangle to expand (display) all the code in that section.
Hi there! Thank you so much for this post! Its been really helpful! I too am having my entire blog post come up in the descriptions on the pins 🙁 any idea why? Also I see you wrote saying to post description to each blog post. I have done that and the whole post still pops up 🙁 DOes it take time?
thanks so much !
xo
Estephanie
Hi! I just looked at your blog and when I try to pin your images, the descriptions are not showing the entire blog post. Looks like you got this fixed?
Thank you so much for this! You cannot believe the trouble I have been having with installing Rich-Pins using Pinterest’s instructions + hopeless CS.
One problem I am seeing is that my original Rich-Pins were picking up the entire article as the description! Now that I have gone through the steps you share here, do you have any idea when Pinterest might correct them?
Thank you again.
Hi Beka, make sure you do Item #2 in Step 1 above: “Add Descriptions to your Blog Posts”
This was so helpful and saved me so much time, thank you so much! Emily x
Thank you. You are a life saver. It did not work at first. I had to do it twice. I just had to click tab to align the code to the other text. Thank you so much.
Hey! It was helpful. But I have 1 query. I have 2 blogs. When I tried for the first, it worked perfectly fine. However for 2nd blog, it was not validated. The error is as shown: “The data we scraped from your site could not be validated. Please make sure all required tags are present and you aren’t serving different pages depending on different user agents.”
Can you help?
It sounds like there’s an error in the code you pasted into your template — or in another area of your template. I would recommend removing the code you pasted into your template and then try going through the steps again to make sure you’re using all the correct code.
Hi Kelly! Thanks for all of your instructions and they were very helpful. I followed them all exactly and have now been approved for rich pins. The problem I’m finding is, like Beka, is that my rich pins are showing the first lines of my article instead of the description box. I already had all of the description box filled out for each of my posts, so I’m not sure what the issue is. Is there a word limit (in the description/search box) I should know of that’s causing this issue? I also know that it will take time for all of my other pins to be changed, so maybe that will be corrected with time? If you wouldn’t mind taking a peek, I’d really appreciate it! My blog is http://caseythecollegeceliac.blogspot.com/ and my pinterest is https://www.pinterest.com/collegeceliacKC/. Thanks!
Hi Casey! I just looked at your blog and when I try to pin your images, the descriptions are not showing the entire blog post. Looks like you got this fixed?
Thank you so much! I had searched a lot sites looking for how to add rich pins on blogger and yours was the only one that included easy, straightforward instructions with code. Thank you a million times over! 🙂
Not only is this super simple, direct, and helpful, but you also finally showed me how and where to set up my meta description, something that has been giving me a headache for days! Thank you so much!
So glad this worked out for you! (And hopefully no more headaches too!)
This was so helpful. Thank you so much for making it do-able to a person that is not technology savvy! I appreciate your help!
Thank you! I was searching like crazy how to do this! Thank you sweetie! <3
Hello! This is a great tutorial and easy to understand. But I’ve tried over and over and cannot get Pinterest to validate.
I am a little confused about one thing…Are we applying the code to one of the blog posts or applying to the main “theme” html?? I do not see a “Template” button- just the “theme” button. (I assume they are the same)
I’ve also just started my blog, so I am not sure if I need more content first, before the Rich Pins will work??
You’re applyting the code to your Blogger TEMPLATE. (You are using Blogger, correct? If you’re using WordPress… then you’d have a THEME. And I have different instructions for that.)
And that’s OK if you only have 1 blog post… you can still setup Rich Pins.
Hi Kelly! Thank you so much for the tuturial, I was getting worried that no one would explain how to get rich pins for blogger! However I did everything like you said but pinterest wasn’t able to recognize my site name and I got this message “The data we scraped from your site could not be validated. Please make sure all required tags are present and you aren’t serving different pages depending on different user agents.”. Can’t understant why, can you please help me?
Thank you so much!
Hmmm…. I’m not sure what’s going on without being able to see your code and settings. But it sounds like something is not setup correctly with the “meta” tags/code in your template. Have you tried going through all the steps a second time (including copying/pasting the code into your template) to make sure you have done every step?
Kelly
Your instructions look so great for Wodpress and Blogger but what about Typepad. I have goggle everything I can think of and can’t find out how to make this word on Typepad. Thanks in advance.
Hi Linda,
I don’t have instructions for Typepad. But you can view Pinterest’s instructions here and try to use them on your Typepad blog: https://developers.pinterest.com/docs/rich-pins/overview/
Hi there! thanks to your other post I was able to put my Pinterest profile on my blog’s sidebar. Now, I’d really like to add rich pins but when I looked for the ” ” in my blog’s template, it says ” 0 of 0″ What does it mean? Is there anywhere around this? I’d really appreciate your help. Shared your site to my blogger friends! Thank you so much!
When you’re editing your template, if you see black triangles on the left side of the code – that means that code is collapsed/hidden in those sections. Make sure you click on those triangles to expand (display) all the code. Then try searching for the code.
Thank you so much for this helpful article!!
Hi Kelly, Thanks for great post! I was able to follow it exactly and even though I got the same message as many people above got, I ignored it, saved it and it worked! I did go back after I read what you said about the black triangle and clicked on it and put the code where you said to. I stil got that message about “can’t put meta code…” but it worked anyway! I immediately received an email saying I was approved and when I went to Pinterest my articles were already changed. WAHOOO! I am a VERY non techy girl so this was a BIG deal for me. Thank you so much!!
Every time I have seen that message, it was due to not having the code in the exact correct location. (You may have to click on multiple triangles to get it all visible.)
But that’s good to know that it still worked out for you, Carol!
That was SO easy, and I was approved by Pinterest within seconds. Thank you so much for this!
Yay!! I’m so glad!
Great, really simple tips. Worked well! The only difference was that instead of (like you say in 3.3) adding the code under the line, I had to include it right after that piece of code, copypasting it to the bit where there were three dots. My template seems was a bit different – worked well nonetheless. Thank you!
Great! I’m glad you got it work.
Thanks for making it so easy to add this code – your page is the first one I found that actually helped! I got Pinterest approval in less than a minute too 🙂 xx
Thank You So Much!!! I followed your steps, it was so easy and in just a few minutes I got approval from Pinterest! 🙂
Awesome! Thanks for letting me know! 🙂
You just made my life much easier with this post. A million thanks to you
Hello there! Thank you so so much for sharing this helpful guide! I was looking for some guidance before but it was so hard to find something I’ll understand. So, once again thank you! 🙂
Have a lovely day,
Lucie
First of all thanks for this but I couldn’t verify it! My site name isn’t showing that though the favicon is showing! Please help.
I just went to the Pinterest Rich Pins Validator and entered your most recent blog post — and it validated. You should be all set.
Regarding the favicon not showing: unfortunately Pinterest has stopped displaying favicons on rich pins.
Okay thanks!
I think I made the mistake, I only typed the website URL without linking to any post! Thanks!
Thank you so much for sharing this. I was struggling with rich pins on Blogger for days, but this has helped me enable them on my blog.
So glad to hear that this helped you!
Hi Kelly, I appreciate the effort you put into writing this tutorial. It is a easy to follow but I am having challenge with Pinterest validator. It showed ERROR! when I tried validating my blog. Please help me out. Thank you.
http://dominikagoodness.blogspot.com.ng
Hi Dominika, I just went to the Pinterest Rich Pins Validator and entered one of your blog posts (6 ACTIONABLE TIPS: HOW TO MAKE AND MAINTAIN FRIENDSHIP WITH YOUR KIND) — and it validated. Were you trying to validate your home page instead? You need to make sure you using one of your blog posts (like the one I listed here). Try that and let me know if that works for you.
Oh my gosh this was SO incredibly helpful. It took me no time at all to set this up. I love the easy instructions. You were right, when I went to the Pinterest instructions it was confusing and I had no idea what to do. I’m excited to see if you have other posts regarding Blogger. Everything out there seems to be for WordPress. And your instructions were so clear and easy to follow. Thank you.
Hi Tiffany,
I do have a few tutorials for Blogger. You can use the “Website search” on the bottom of my website to search for “Blogger” – and they should all come up. (But mostly I focus on WordPress websites – as that is what the majority of my clients use.)
Thank you its really helpful. I search a lot but all over there is for wordpress, only here I find it for blogger.
Kelly,
Thank you for such a clear tutorial. I used it once before on a different blog and it worked perfectly. My new blog uses a template and after opening all of the black triangles the following line of code returns results: “not found”. I thought perhaps the template is already set up for rich pins but I tried the validator, which returns the following: We were unable to retrieve any data from your URL.
Can you offer guidance on this please? Thank you.
Clarification: The search for results in “not found”
Which template are you using? Is it one provided by someone other than Blogger? If so – you’ll want to check with the template developer.
Thank you so much for this, Kelly! Was able to create rich pins succesfully.
With your help, I was finally able to add rich pins to my blog. Thank you so very much!
Awesome! So glad it helped you!
Hy am having trouble doing this
What kind of trouble are you running into?
Hi, Kelly.
First of all, let me say that your article was helpful and thank you.
I used the code that you provided but the pin linking back my article: — is not showing up as a Rich pin. I want the title on my blog post to show up on pins linking back to it. I did use the Rich pin validator and my Rich Pins are approved.
My pinterest page is —
How can I get the title of my article at the above link to appear on the pins linking back to it?
Thanks!
Hi Salonge,
I just looked at your article and the code that’s supposed to be in your template is not in there. You need to edit your blog’s template following the instructions in the “3. EDIT YOUR BLOG’S TEMPLATE” section of my blog post.