Disclosure: This post contains affiliate links for products or services that I personally use and highly recommend. If you click on the link and make a purchase, I may receive a commission, at no additional cost to you. I only recommend products or services I believe will be good for my readers and clients. (I don’t recommend junk; that’s not how I roll.)
Online quizzes are hot. I’d be willing to bet you’ve taken at least one “Which Type of ____ are you?” quiz that you found on Facebook. Am I right? And while these quizzes are fun… they can also serve another purpose: growing your email list!
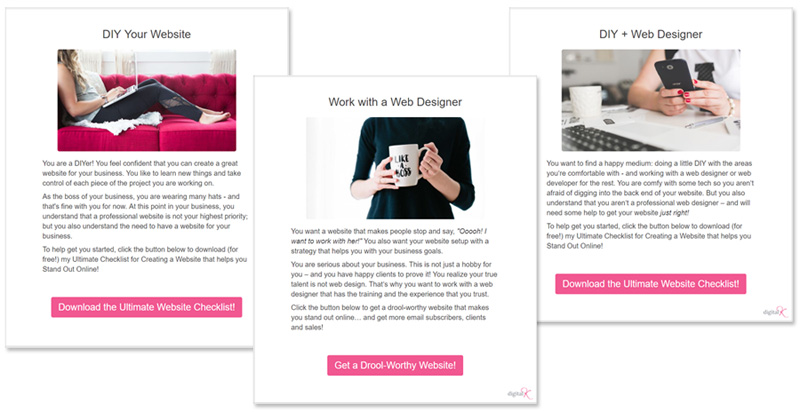
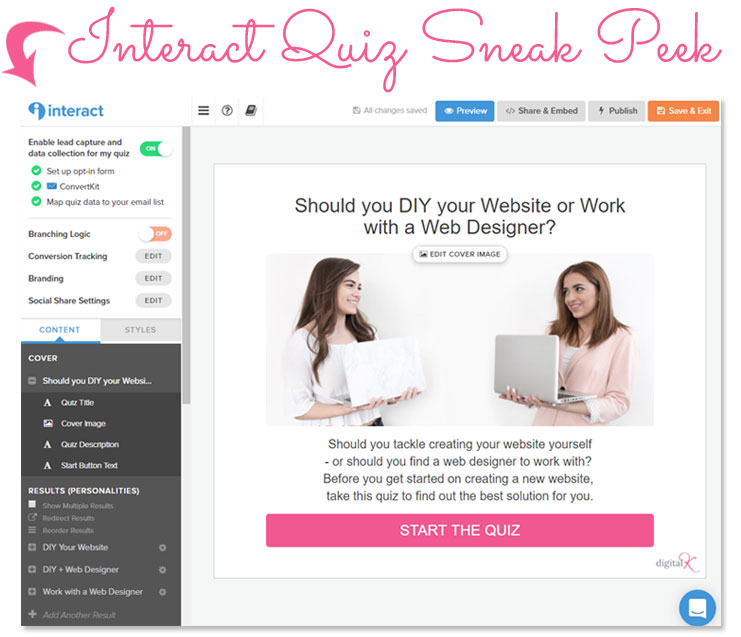
Last month I created a quiz on my website: Should you DIY your Website or Work with a Web Designer? And over the past few weeks, I’ve had several people ask me how to create a quiz for their website as well. And while I could write all about the steps you need to take in the software to setup the quiz… I really want to emphasize the planning of the quiz first. Just like with creating a website – the planning and strategy piece is oh SOOOOOO important to getting results for your business. Unfortunately, that’s the piece that I see most entrepreneurs neglecting! So today – I’m going to share with you the steps I took to STRATEGICALLY PLAN my online quiz to grow my email list.
(Hint: You should follow this plan to create a quiz that grows your email list too!)
Step 1: Pick Your Quiz Topic and Title
The success of your quiz greatly depends on this one point:
Create the quiz with your ideal client in mind.
- What topics are they interested in?
- What would make them want to drop everything they’re doing to take your quiz?
- What are some questions your ideal client has that you can answer for them through your quiz?
- How much time do they have to take your quiz?
- How can you make the quiz fun and exciting for them?
After you choose your quiz topic, create a catchy title for your quiz. Make it short and fun! Or make it address a question or need that you know your audience has. Grab your audience’s attention through a title they can’t resist.
Step 2: Plan Your Quiz Results
Now that you have your topic for your quiz, choose the different quiz results you will have. For example, in my quiz I have 3 different results that people can get after they take the quiz:
- DIY Your Website
- Work with a Web Designer
- A combination of DIY-ing and Working with a Web Designer
Your quiz might include more results – but keep in mind that the more results you choose to have, the amount of work that you will need to do will exponentially grow. So to make it easier on yourself, I would start out with having just 2-4 results.
Now write out the characteristics of each of these results. What makes each of them different? Are there any characteristics that some of them share? For example, when I planned out my quiz, I knew that some of the characteristics that were different between website DIYers and people that should hire a web designer included: their budget, their timeline, how much technical and design experience they have, and how much time they have to work on their website.
Don’t skip this step! It’s important to have a good handle on the characteristics of each of your quiz results first – because that makes the next step so much easier!
Step 3: Plan Your Quiz Questions and Answers
Now that you have your quiz results really flushed out, it’s time to write your quiz questions and answers. Here are a few tips:
- Write out your questions and answers as if you are actually talking to the person who is taking the quiz. Don’t be stuffy; add some personality to your quiz to make it more fun for them.
- Make your questions and your answers short and to the point. You want your quiz to only take a few minutes to complete. People are busy and have short attention spans; we don’t want them getting bored and leaving before they’re done taking the quiz!
- Make sure your questions show your expertise. Remember: this might be the first contact you have with new potential clients – so you want to show that you know your stuff – and that you can help them.
- Take a look at the differences you wrote down for your quiz results in Step #2 – and use those items as your questions.
- Put your questions in an order that makes the most sense for your quiz takers. Do two of your questions relate to each other? You might want to ask them one after the other. Is one of your questions something that would make your idea clients say, “Oooooh! That’s a good question!”? If so – make that the first question in your quiz.
- Think about each quiz result type – and come up with an answer (or 2!) that would match what they would have for that question. Make sure each result type is covered with at least one of the answers. Sometimes you’ll find that you have multiple answers for a specific result type… or you might have one answer that matches multiple quiz results. That’s perfectly fine, as long your quiz software can handle that. (We’ll talk about your quiz software/platform in step #6.) You might also find some answers that don’t fit any of your result types; so rewrite or delete them.
Step 4: Create a Plan for Getting Email Subscribers
Let’s think about how to grow your email list with your quiz. When someone finishes taking your quiz – but before you show them their quiz results! – include a lead capture form, giving them the option to opt-in to your email list. You can link this form to your email marketing program so they automatically get added to your list. And then you can send different follow-up emails to them, based on which quiz result they got.
Think about what would make people want to opt-in to your list (besides just seeing what their quiz result is). Let’s offer them an incentive to sign-up! You can give them additional information about their quiz results. You can also include a freebie related to your quiz or to their quiz result. Outline what information and optional freebies you will be giving for each result type.
Decide if you want to force people to opt-in in order to see their results – or if you want to give them the option to skip the opt-in and just go straight to their result. I decided to allow my audience to skip the opt-in if they want to. The reason? I only want people on my list that are truly interested in my tips and services. I don’t want people to opt-in just to receive their results. This cuts down on bad leads and fake emails on my subscriber list. AND… it allows me to build a stronger list of subscribers who are interested in hearing from me again!

Step 5: Plan Your Quiz Results Pages
After the email opt-in screen, you’ll display the result of their quiz. Each quiz results page should be customized based on their quiz result (a different result page for each result type).
- Tell them the quiz result – in big, bold lettering at the top of the page.
- Include a photo that is related to the quiz result they got.
- Include a brief (2-3 paragraphs) explanation of their result. Put a positive spin on each result. For example, on a personality quiz you could include some benefits of that personality type.
- Include a large button that links to one of your quiz benefits from Step 4 (one of your freebies – or a link to a blog post or video with more information related to their quiz result).
- Include social sharing buttons so they can share their quiz results on their social media accounts (which can bring more traffic to your quiz!)
Step 6: Plan Your Email Funnels
After someone completes your quiz and opts-in to your email list, now you need to build your relationship with that new lead. At this point many business owners make the mistake of just planning out one email (if that!) and then just continuing with their regularly-scheduled emails. But that is NOT what I recommend. You have a new subscriber who is interested in hearing from you… so let’s make the most of this!
First, write out a few emails to send to your new subscriber based on their quiz result. Tailor your emails to what they need – so they find value in the messages you’re sending them. Setup a different email funnel (aka email sequence or email autoresponder series) for each of your quiz results. For example, I have setup a different email sequence in ConvertKit for each of my 3 quiz results. Each email funnel includes 4-5 emails that I send out over 6-10 days. The first email includes more information about their quiz result. And the remaining emails include tips and resources for either DIYing their website or for working with a web designer, depending on what their quiz result was.
Optional Step 6b. Plan an Upsell
Always think about the upsell process when creating funnels for your business. After you have provided value with the information you send in your emails, you can include an offer for a related product or service. For best results, make sure your offer is related to the information you’ve been giving in your email funnel. And consider making it time-sensitive (giving them a discount that’s good only for the next 3 days, for example). If they don’t purchase this upsell after 2-3 emails, you can also offer a second, lower-priced upsell.
Step 7: Pick Your Quiz Software
Disclosure: Interact gave me an account to test out their quiz software. However all opinions in this article remain my own and I was in no way influenced by the company.
There are many different quiz platforms and plugins available. Before choosing which one you want to use, think about all the features and functionality you will need for your quiz. Steps 1-3 above should give you a pretty good feel for what functionality you need with the quiz questions, answers and results. (For example, do some of your questions have answers that apply to more than one of your quiz results?) And Steps 4-6 will help you identify what you need in order to get the quiz and your email marketing provider to work well together. (For example, you want each quiz result to get into its own, separate email funnel.) Here are some additional things to keep in mind:
- Do you want to customize the design with your choice of colors, images and buttons?
- Do you want to add your logo to the quiz – or are you OK with the quiz software’s logo being displayed instead?
- How user-friendly is the software for you to setup? For example, do you want a drag-and-drop solution?
- Does the quiz software work with your website platform (WordPress, Squarespace, etc.)?
- Does the quiz software work with your email marketing program (ConvertKit, Mailchimp, etc.)?
- Do you want the quiz to be mobile-responsive? (Hint: The answer here is Yes!)
- Do you want the quiz to include social sharing buttons?
Choosing a quiz software/platform sounds like it shouldn’t be too difficult. But take it from me: all quiz builders are not created equal! A few months ago I had a client who needed help setting up a quiz on her website. We went through not one, not two, but THREE different quiz plugins before we found one that would work for her! One plugin didn’t work with her email marketing provider. Another plugin didn’t work with her web hosting provider! Finally, after several hours of troubleshooting and trial-and-error, we found one that would work with both. But we still had several issues with that one as well! Which is why I haven’t given my “stamp of approval” on ANY quiz software solutions — until now…
I LOVE the quiz software that I use on my website: Interact Quiz Builder. Not only does it include all the features I wanted (See my partial list of features I wanted in the bulleted list above.) – but it’s also so easy to use and their customer service has been excellent as well. They have a FREE plan you can use to try it out – and they also have a TON of quiz templates you can use to get started with your quiz quickly and easily!
Step 8: Take Care of the Tech
OK… now it’s time to set this all up with your quiz software, your website, and your email marketing program.
- Create your quiz in the quiz software/builder of your choice.
- Create your email funnels in your email marketing service.
- Connect your quiz to your email marketing service. If you’re using Interact Quizzes and ConvertKit, like I do, you can connect each quiz result to its own email sequence in ConvertKit.
- Add the quiz to your website.
Make sure you are testing along the way – to make sure your quiz and email funnels are all working correctly.
Step 9: Promote Your Quiz
Now that you have your quiz all setup, you’re ready to launch it and start capturing leads. The key to getting a ton of responses to your quiz (and more email subscribers on your list!) is to promote it. Here are some ways you can promote your quiz:
- As a popup on your website
- In your website or blog’s sidebar
- As a featured call-to-action on your website’s home page
- In your website footer
- As a call-to-action on the bottom of related blog posts
- Write a blog post about your quiz (or related to the topic of your quiz) and include link to your quiz
- In your email newsletter
- Post on your social media accounts
Step 10: Monitor Your Results and Fine-Tune
It’s important that you check the progress of your quiz funnel. By doing this, you’ll know if your quiz and email funnels are working for you to get more email subscribers – and more business. You’ll want to make sure you track the following information:
- Number of visitors to your quiz
- Number of people who start taking your quiz
- Number of people who complete your quiz
- Number of people who opt-in to your newsletter from your quiz
- Email open rates and unsubscribe rates in your email funnels
- Purchases made through your email funnels
If you notice that you’re not getting the visits you need, the quiz submissions you want, or your conversion rates are low – then you can consider fixing the following:
- Quiz topic – Is this really something your audience is interested in?
- Quiz title – Is the title capturing their attention?
- Quiz questions and answers – Do you have too many questions? Are your questions or answers too wordy or confusing? Does your quiz take too long to fill out?
- Quiz Software/Platform – Is it simple and intuitive for people to take the quiz? Does it look professional?
- Opt-in Form – Can you work on your copy to encourage people to opt-in?
- Results Pages – Do the quiz results match up correctly with the answers? Are you giving them a “teaser” for what they can expect from you next?
- Email funnel after the quiz – Are you providing helpful information related to their quiz result?
Final Step: Watch the Subscribers Roll on In!
Is this a lot of work to setup? Yep.
Is it worth it? YES! – if you are providing value to your subscriber.
My open rate for my quiz email funnels is the best (highest) out of all my opt-in offers. And my number of unsubscribers from these email funnels is ridiculously low as well. This tells me that my subscribers are:
- interested in reading my emails and
- getting value out of the information I’m sending them
The planning and strategy piece is SOOOOOO important to getting good results. And this blog post outlined the exact steps I went through when I created my online quiz. If you want even more help with creating your online quiz, check out my Quiz Planner below. It walks you through all these steps in more detail, including fill-in-the-blank worksheets and exercises to help make the process easier and quicker to setup!
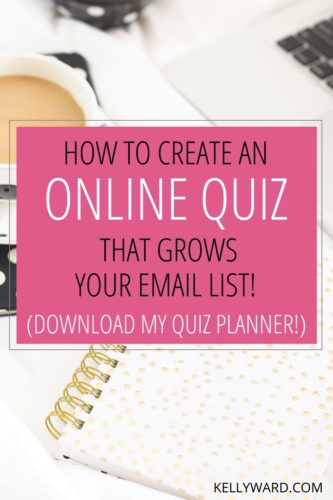
Online Quiz Planner
Use my Online Quiz Planner to plan and setup your online quiz. When done right, online quizzes can grow your email list and make you money!
Just like with creating a website – the planning and strategy piece is so important to getting results for your business. Gone are the days of tossing a simple opt-in gift up and walking away, hoping that the emails will start flooding in. Now you need to up your game a bit. And that’s where this planner comes in handy! Check it out!

Don’t forget it… Pin it!